++++++++++++++++++++++++++++++++++++++++++++++++++++++++++++++++++++++++++
++++++++++++++++++++++++++++++++++++++++++++++++++++++++++++++++++++++++++
cat /tmp/logins_2.log | awk "/$value1/ "' { print $0 }' >> /tmp/logins_3.log
++++++++++++++++++++++++++++++++++++++++++++++++++++++++++++++++++++++++++
++++++++++++++++++++++++++++++++++++++++++++++++++++++++++++++++++++++++++
cat /tmp/logins_2.log | awk "/$value1/ "' { print $0 }' >> /tmp/logins_3.log
+++++++++++++++++++++++++++++++++++++++++++++++++++++++++++++++++++++++++++
DNS Server Configuration
https://www.youtube.com/watch?v=0X9em99Vcl0
How to configure DNS Server on CentOS 7
https://www.unixmen.com/setting-dns-server-centos-7/
CIDR - IP RANGE : https://www.ipaddressguide.com/cidr
+++++++++++++++++++++++++++++++++++++++++++++++++++++++++++++++++++++++++
>> BIND is a DNS package on the linux OS
What is DNS ?
Translates Internet Domain and host names to IP Addresses and vice-versa . Every Host is physically identified by using its IP address , but most of you might not know that each IP address is unique only to that domain .

Whichever machine you configure the DNS is called the DNS server , and every system that accesses the server is called the DNS client . So we do not have much of a configuration to from the DNS client side .
DNS LookUp request :

Forward Lookup : when you enter a hostname in your URL , an IP address is return - this is called a forward lookup. it resolved a hostname to an IP Address .
Reverse Lookup : if you enter an IP address of the hostname , it will return you with the hostname this is called reverse lookup.
Where does the DNS sever gets the IP address of the hostname ?
Let's say we are trying to access google.com now that request will first of all go to a resolver - Now your resolver is nothing but your ISP server - It is basically built into your network operating system and the IP Address of google.com will be built into resolver , it will be present in the cache memory and since the IPADDRESS rez would be present the hostname will be resolved
But if you are trying to access a new website and the resolver does not have your IP Address . We have the different root hierarchies of DNS , those would be accessed , that's when the whole concept of DNS comes to the picture , that's where we have something called as the root server . Now the root server sit at the top of the DNS hierarchy .
There are about 13 sets of root server placed strategically around the world and about 12 organizations access or control these root servers .
The root servers will not tell you the IP Address to which your hostname is resolved to . What the root server will do is it will point you to another server and that is called the "Top-Level-Domain Servers" . Also called TLD servers and when they point you to TLD server , TLD servers will have further information - They will point you to a direction where you will get the IP Address
So the root server will point you back to the TLD Servers in which your domain may be hosted. The domain that you are trying to access that may be hosted on one of the domains over here . One of these domains is what make up these 13 sets of root servers . From the 13 you shortlist one of them , those come to the resolver it tries to access the Top-Level-Domain servers and these top-level domain server store information such as .com , .net , .dot.org domains be it google.com , facebook.com those kind of information shall be present in the top level domain servers
Even now you cannot total resolve to particular domains IP Address , suppose I want to access a particular IP Address inside a domain . The top level domain servers only knows that these kind of IPAddress are hosted in these servers . What the TLD will do is it will again return back the particular domain -- lets say authoritative name server , - The TLD will return authoritative name server authoritative name server to the resolver - so based on that information the resolver will query the authoritative nameserver . Now name server is what knows everything about the domain including the IP Address .
Root server will return the top-level domain servers ie .com , .net, or .org . and the top level domain servers will return the domains where your IPAddress is part of that is through the authoritative name servers and finally the resolver will get to the respective IP Address through the authoritative name server . Finally it will store the IP Address in its cache locally for later use.

DNS Server : There are loads of DNS server available in the market
We will be using "BIND DNS Servers" . BIND is the most popular and the one of the oldest DNS servers and it is basically a nameserver and can also be configured for mail service
Others DNS servers : Unbound , Power DNS
Configure a BIND DNS server in 10 steps .
Firstly we need to install BIND , because BIND is a DNS service and we will have to install it.
You can use "yum" command in CentOS machines to install them , in Ubuntu machines "apt-get install"

2. Step : Assign a Static IP Address
Why we add a static IP address to your machine where you are configuring the DNS server .
>> because if your server reboots you do not want your IP Address to change , that is the reason for having a Static IP Address. You say Boot protocol is static

We need to add these lines IPADDR, NETMASK,GATEWAY - the rest remains the same.
Then you need to define a fully qualified hostname
Assign A FQDN for server

Configure /etc/hosts file

In this case you can avoid the "dns1" here but you need to put in the domain name "vardhan.com"
Configure /etc/resolv.conf
This is something that you also have to configure on your DNS client machine . This is the only step that you need to do it in the DNS client side.
you must say name server and point your IP Address that you want to act as the DNS Server
> Configure /etc/named.conf -- From here the configuration is about BIND DNS
This file is popped up when you install BIND

You will have the key word : localhost here you need to replace this with the IPAddress . You will have one more number which is the IPV6 Port number . You need to comment out this line , you don't need this line any more .

> Configure /etc/rfc.1912.zones -- This file appears when you install BIND , here is where you define your zones .
Now there are two concepts of "Forward Lookup" and "Reverse Lookup"
when you type "hostname" and hit enter that is called the Forward Lookup howevet you enter the IPAddress that is the reverse lookup .
If you want people to query your server either in the forward or reverse fashion one of these lookup fashions that time for that purpose you need to setup two different zones.
So your first zone will have rules and settings for what should be returned to them when they access you from forward look up. And when they access your server from the reverse lookup then the settings will be present in this zone .
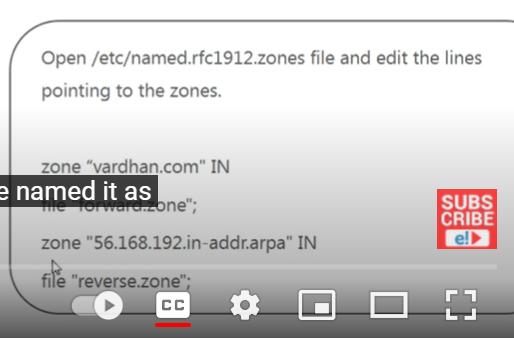
Next step is configuring the forward and the reverse zones - we have created a new file "Forward.zone" and another file "Reversed.zone" .
> Configuring the Forward and the Reverse Zones :
We have to add the rules over here that's what you will do over here you create one and you open them you will have a basic template , you need to edit that template and replace it with your hostname and your IPAddress.
> Change the group ownership of those two files.
After changing the group ownership of those file.
Restart your DNS servers and your service will be up and running .
> Hands On

> NEXT VIDEO -- DNS server configuration .
++++++++++++++++++++++++++++++++++++++++++++++++++++++++++++++++++++++++
Hindi Video : https://www.youtube.com/watch?v=MgIHgbcKjIw
++++++++++++++++++++++++++++++++++++++++++++++++++++++++++++++++++++++++
check if BIND package is present on OS
$ rpm -qa | grep bind

BIND is already present on this system . Choose another system where the bind was not available . to install DNS server .
Below is the command to install DNS server .

The things to edit in this area of the file > /etc/named.conf
Check the IP Address of your DNS Server > ifconfig
You will have to edit the first line with the IPAddress, you can keep the IPAddress mentioned in there . You can even remove that , but it advisable to keep that and add your IPAddress by adding a semi-colon .

Next parameter :
which machines can query the DNS server .

"any" = allows any client to query the DNS server .
But if you have a particular network and you want to only provide a set of IP Addresses to query your DNS server then you can specify the IP range,

If it is a public DNS we normally use "any" for this parameter .
This file also has two files included . And there is no other changes that need to perform on this
There are two files included here.

This we use for DDNS : Dynamic DNS Server , when you set up your DHCP and when your client machine takes the IP from the DHCP , then the DHCP provides the hostname -- when does it give when you set up DDNS
So that it pickups the hostname of the machine which is available in the computer and it register the name in the DDNS and this is done dynamically .
DDNS is used when DHCP is used. Without DHCP you cannot configure DDNS server .
But we are setting static DNS server where the registry is manually done .
-- We make the following changes .

save the file /etc/named.conf
Open this file : /etc/named.rfc1912.zone

Editing the domain name and the zone

if you create the file as "/data/f.zone"; -- then you need to create the directory /data and f.zone file with in it.
or keep it as f.zone alone without a directory - if you need to create a directory you can do that indeed.
The above ENTRY is for forward.zone
Now lets make an entry of reverse.zone -- go to the bottom of the page


Save file : /etc/named.rfc1912.zone
Now create the zone file > cd /var/named
-- One thing that you need to make sure if these file are are present in the /var/named


opy the named.loopback > cp named.loopback

cp named.loopback 0.168.192.in-addr.arpa
+++++++++++++++++++++++++++++++++++++++++++++++++++++++++++++++++++++++++++
Red Hat identity and access management vision, solution, and roadmap - YouTube
+++++++++++++++++++++++++++++++++++++++++++++++++++++++++++++++++++++++++++
Defining Host-Based Access Control Rules
Defining Host-Based Access Control Rules
Access controls, at a high level, define who has access to what. The who is an IdM user, and the what can be either a host (target host), service, or service group, or a combination of the three.
+++++++++++++++++++++++++++++++++++++++++++++++++++++++++++++++++++++++++++
+++++++++++++++++++++++++++++++++++++++++++++++++++++++++++++++++++++++++++
Red Hat 8.3 : OPatching
STEP 1 : PRE CHECK


-----------------------------------
STEP 2 : BASIC HEALTH CHECK

 |

For Red Hat Linux distributions (e.g. RedHat, CentOS, Oracle), the following commands check for updates and patches the system:
yum check-update
yum update
For Suse-based Linux (e.g. Suse Linux Enterprise, OpenSuse), the following commands check for updates and patch the system:
zypper check-update
zypper update
For Suse-based Linux (e.g. Suse Linux Enterprise, OpenSuse), the following commands check for updates and patch the system:
zypper check-update
zypper update
+++++++++++++++++++++++++++++++++++++++++++++++++++++++++++++++++++++++++++
Shell Scripting Tutorial for Beginners 1 - Introduction - YouTube Ubuntu is used ....
Shell Scripting Tutorial-1 Course Content - YouTube
+++++++++++++++++++++++++++++++++++++++++++++++++++++++++++++++++++++++++++
Shell Scripting Tutorial-1 Course Content - YouTube
+++++++++++++++++++++++++++++++++++++++++++++++++++++++++++++++++++++++++++
IP TABLES
+++++++++++++++++++++++++++++++++++++++++++++++++++++++++++++++++++++++++++
IP Tables and Firewalld an Introduction :
Redhat has a Powerful firewall built in - Called IP Tables . But if you were to look at it more carefully it is IP Tables /Netfilter
IP Tables is a user space module , the bit with which the user interact with at the command line to enter firewall rules into per-defined tables .
Netfilter : Is the kernel module built into the kernel which actually does the filtering .
Front end GUI available for IP Tables , that allows users to add or define rule based on a point and click user interface . But this often lacks the flexibility that the command line tool provides .
We are going to learn the command line interface of IP Tables
Basic Understanding the way it works.

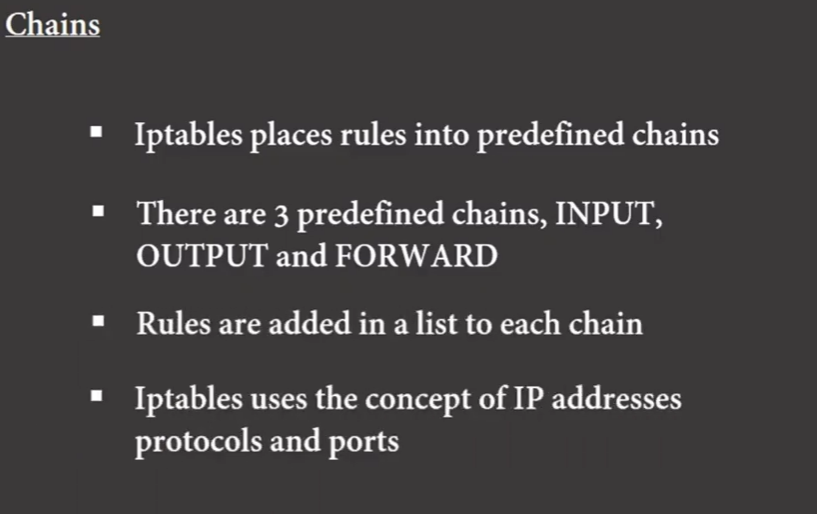
There are three predefined chains in the filter table which we can add rules for processing IP Addresses .
The concept of default policy
Working with IP Table from the command line needs root privileges , so you need to become root for most things you are doing .
One important things - We will be turning off the IP table and resetting the firewall rule so if you are relying on firewall as your primary line of defense you should be aware of this .
IP Tables should be installed by default on all CentOS and Redhat machines . you can check that by running the below command
$ rpm -q iptables

$ lsmod | grep ip_tables
$ iptables -L

If IPtable is not running on your system this is how you can get it started
$ system-config-securitylevel^C
In CentOS
sudo systemctl start iptables
sudo systemctl enable iptables
In this lecture we are going to write a simple rule-set . At this point we are going to clear the default rule set, so if you are connecting so if you are connecting remotely to a server via SSH for this tutorial
Then there is a real possibility that you can lock yourself out of your machine .
So you must set the default INPUT policy to ACCEPT before flushing the current rules. And then add a rule from the first to explicitly allow yourself access to prevent against locking yourself up. So this is just a cautionary note .
We will use an example based approach to examine the various IP tables command . In this example we will create a very simple set of rules to setup up state-ful packet inspection or SPI firewall that will allow all out going connection but block all unwanted incoming connection .
$ iptables -P INPUT ACCEPT
$ iptables -F
$ iptables -A INPUT -i lo -j ACCEPT
$ iptables -A INPUT -m state --state ESTABLISHED, RELATED ACCEPT

Last one is > iptables -L -v
lets take a look at all the commands that we have run so far .
$ iptables -P INPUT ACCEPT -- while connecting remotely we need to temporarily set the default policy on your input chain . other while flushing the current rules we will be locked out of the server .
+++++++++++++++++++++++++++++++++++++++++++++++++++++++++++++++++++++++++++++++++++++++++++++++++++++++++++++++++
https://www.youtube.com/watch?v=hugEkh50Ynk
+++++++++++++++++++++++++++++++++++++++++++++++++++++++++++++++++++++++++++++
How to add virtual disk to an existing virtual machine and then using common LVM - using Logical Volume Management Tools inside linux we will extend the size
There are couple of ways to create additional disk space for virtual machines . There is a tool on your host machine for Virtual Box - Called VBOX Manage and you can modify HD . you could expand the size . Right now I have the default size of 12G . I could make it Bigger if I want .
But I will show you another method to do this. We will just create new drives in here .
The command lines that I am going to show will work for any distribution . It does not matter if you have a GUI or not or debian based or RPM based
check the logical volumes
$ lvdisplay -- This will display all the logical volumes that you have in there .

There is a single Volume Group called mint-vg
Adding New Virtual Disk - VM -- Storage -- Add a Hard disk

We created two new Virtual disks .
>>> lsblk

Check the hard disks
$ ls -l /dev/sd * -- sd stands for scsi disk devices

And there are three partition under it.
And the below ones are the New disks we added. /dev/sdb & /dev/sdc
The first we are going to do is Partition .
$ sudo su - / move in as root
We are going to use the fdisk utility for doing the partition
$ fdisk /dev/sdb


Hex Code : 8e -- Mean Linux VM

W to write the table to the disk


Now if you do
$ ls -l /dev/sd* -- this will show up the new partitions

That's how you use fdisk -- this created partitions for you .
Next thing that we are going to do it
$ pvdisplay
As you can see you only have a single Physical Volume

$ pvcreate -- to add these two new virtual disks partitions
The pvcreate command initializes a physical volume for later use by the Logical Volume Manager for Linux. Each physical volume can be a disk partition, whole disk, meta device, or loopback file. $ pvcreate /dev/sdb1 /dev/sdc1

Will do pvdisplay again
$ pvdisplay
now two physical volume has been created
/dev/sdb1 /dev/sdc1

display existing Volume Groups in there
$ vgdisplay

Now we have one Volume Group. And now we are going to add the two physical volume to this single Volume group that we have
$ vgextend -t / t stands for test to test it out this won't comment or change anything .
$ vgextend -t -v mint-vg /dev/sdb1 /dev/sdc1
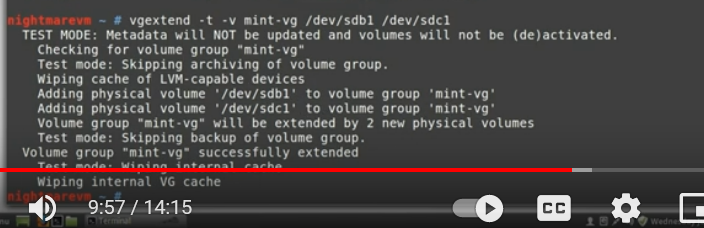
This was in the test mode so the data will not be updated. this time we will use the same command without the -t test option in there
$ vgextend -v mint-vg /dev/sdb1 /dev/sdc1
$ vgdisplay --As you can see there is one existing Volume group
Now we are going to add two of these physical volumes

The important thing to know is PE - stands for Physical Extend .1541 is number that we need to remember. we have 6 GIG that is current free .
The orginal Logical volume has 11.73 -- this is what the real state of the computer was .
We have added additional 3 Gig each to it which makes up to 6GB -- This is what we have added .
This is the Physical extends and we want to add this into Logical Volumes .
Currently We have only two logical Volumes

$ lvextend -l //- l means the amount of size you want
$ lvextend -l +1541 -r // -r for automatically resize the file system
$ lvextend -l +1541 -r -t // -t for test
$ lvextend -l +1541 -r -t -v // -v define the volume group
$ lvextend -l +1541 -r -t -v /dev/mint-vg/root

$ lvextend -l +1541 -r -v /dev/mint-vg/root
Now if you do df -h

| Command | Description |
|---|---|
| dumpconfig | Dump the active configuration |
| formats | List the available metadata formats |
| help | Display the help commands |
| lvchange | Change the attributes of logical volume(s) |
| lvcreate | Create a logical volume |
| lvdisplay | Display information about a logical volume |
| lvextend | Add space to a logical volume |
| lvmchange | Due to use of the device mapper, this command has been deprecated |
| lvmdiskscan | List devices that may be used as physical volumes |
| lvmsadc | Collect activity data |
| lvmsar | Create activity report |
| lvreduce | Reduce the size of a logical volume |
| lvremove | Remove logical volume(s) from the system |
| lvrename | Rename a logical volume |
| lvresize | Resize a logical volume |
| lvs | Display information about logical volumes |
| lvscan | List all logical volumes in all volume groups |
| pvchange | Change attributes of physical volume(s) |
| pvcreate | Initialize physical volume(s) for use by LVM |
| pvdata | Display the on-disk metadata for physical volume(s) |
| pvdisplay | Display various attributes of physical volume(s) |
| pvmove | Move extents from one physical volume to another |
| pvremove | Remove LVM label(s) from physical volume(s) |
| pvresize | Resize a physical volume in use by a volume group |
| pvs | Display information about physical volumes |
| pvscan | List all physical volumes |
| segtypes | List available segment types |
| vgcfgbackup | Backup volume group configuration |
| vgcfgrestore | Restore volume group configuration |
| vgchange | Change volume group attributes |
| vgck | Check the consistency of a volume group |
| vgconvert | Change volume group metadata format |
| vgcreate | Create a volume group |
| vgdisplay | Display volume group information |
| vgexport | Unregister a volume group from the system |
| vgextend | Add physical volumes to a volume group |
| vgimport | Register exported volume group with system |
| vgmerge | Merge volume groups |
| vgmknodes | Create the special files for volume group devices in /dev/ |
| vgreduce | Remove a physical volume from a volume group |
| vgremove | Remove a volume group |
| vgrename | Rename a volume group |
| vgs | Display information about volume groups |
| vgscan | Search for all volume groups |
| vgsplit | Move physical volumes into a new volume group |
| version | Display software and driver version information |
++++++++++++++++++++++++++++++++++++++++++++++++++++++++++++++++++++++++++
https://www.youtube.com/watch?v=dMHFArkANP8
++++++++++++++++++++++++++++++++++++++++++++++++++++++++++++++++++++++++++
LVM is short for Logical Volume Manager
What it does ? it allows for the creation of groups of disks or partitions that can assembles into single (or multiple filesystems )
Example of a Logical Volume Group .
At the bottom level you are going to have your Physical Volumes which are your actual disks that you have in your system such as below ones .

Above your physical volume you have something called your Volume Group . As you can see the Volume Group VG_Base encompasses all volume groups .

And top of your Volume Group you are going to have your actual Logical Volume .

Above the Logical Volumes we have your actual filesystems .

Basic commands that will display the setup here on the machine .
$ pvs command for Physical Volume command
Physical Volume Scan : pvs
This display all physical volume that belong to one logical volume manager setup .
This Physical disk has a volume group

Now lets go one step above that and take a look at Volume Groups. We use the vgs command for this . VGS like PVS scans for various volume groups on your system

So lets run LVS to run a short volume scan to see what these logical volumes are .
$ lvs
ans here we can see two individual logical volumes
