+++++++++++++++++++++++++++++++++++++++++++++++++++++++++++++++++++++++++++++++++++++++++++++++++++++++++++++++++
https://www.youtube.com/watch?v=hugEkh50Ynk
+++++++++++++++++++++++++++++++++++++++++++++++++++++++++++++++++++++++++++++
(HOW-TO) Add disks in VirtualBox and extend disk space using LVM for Linux guests
How to add virtual disk to an existing virtual machine and then using common LVM - using Logical Volume Management Tools inside linux we will extend the size
There are couple of ways to create additional disk space for virtual machines . There is a tool on your host machine for Virtual Box - Called VBOX Manage and you can modify HD . you could expand the size . Right now I have the default size of 12G . I could make it Bigger if I want .
But I will show you another method to do this. We will just create new drives in here .
The command lines that I am going to show will work for any distribution . It does not matter if you have a GUI or not or debian based or RPM based
check the logical volumes
$ lvdisplay -- This will display all the logical volumes that you have in there .

There is a single Volume Group called mint-vg
Adding New Virtual Disk - VM -- Storage -- Add a Hard disk

You can bind them all here - the multiple disks in here and the you can group them together to have large volume group
We created two new Virtual disks .
>>> lsblk

Check the hard disks
$ ls -l /dev/sd * -- sd stands for scsi disk devices

The Original Virtual disk we have in there /dev/sda
And there are three partition under it.
- /dev/sda1
- /dev/sda2
- /dev/sda5
And the below ones are the New disks we added. /dev/sdb & /dev/sdc
The first we are going to do is Partition .
$ sudo su - / move in as root
We are going to use the fdisk utility for doing the partition
$ fdisk /dev/sdb


Hex Code : 8e -- Mean Linux VM

W to write the table to the disk


Now if you do
$ ls -l /dev/sd* -- this will show up the new partitions

That's how you use fdisk -- this created partitions for you .
Next thing that we are going to do it
$ pvdisplay
As you can see you only have a single Physical Volume

$ pvcreate -- to add these two new virtual disks partitions
The pvcreate command initializes a physical volume for later use by the Logical Volume Manager for Linux. Each physical volume can be a disk partition, whole disk, meta device, or loopback file. $ pvcreate /dev/sdb1 /dev/sdc1

Will do pvdisplay again
$ pvdisplay
now two physical volume has been created
/dev/sdb1 /dev/sdc1

display existing Volume Groups in there
$ vgdisplay

Now we have one Volume Group. And now we are going to add the two physical volume to this single Volume group that we have
$ vgextend -t / t stands for test to test it out this won't comment or change anything .
$ vgextend -t -v mint-vg /dev/sdb1 /dev/sdc1
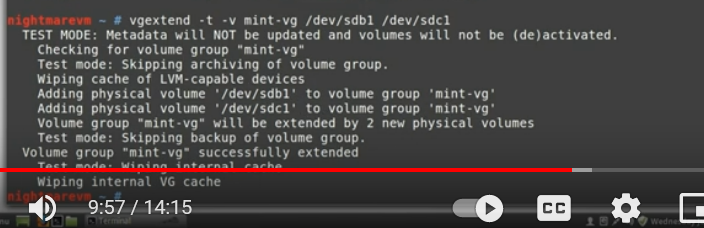
This was in the test mode so the data will not be updated. this time we will use the same command without the -t test option in there
$ vgextend -v mint-vg /dev/sdb1 /dev/sdc1
$ vgdisplay --As you can see there is one existing Volume group
Now we are going to add two of these physical volumes

The important thing to know is PE - stands for Physical Extend .1541 is number that we need to remember. we have 6 GIG that is current free .
The orginal Logical volume has 11.73 -- this is what the real state of the computer was .
We have added additional 3 Gig each to it which makes up to 6GB -- This is what we have added .
This is the Physical extends and we want to add this into Logical Volumes .
Currently We have only two logical Volumes

$ lvextend -l //- l means the amount of size you want
$ lvextend -l +1541 -r // -r for automatically resize the file system
$ lvextend -l +1541 -r -t // -t for test
$ lvextend -l +1541 -r -t -v // -v define the volume group
$ lvextend -l +1541 -r -t -v /dev/mint-vg/root

Now we will remove the -t flag
$ lvextend -l +1541 -r -v /dev/mint-vg/root
Now if you do df -h

The root mount point is added with 16GB
LVM Partition Management
| Command | Description |
|---|---|
| dumpconfig | Dump the active configuration |
| formats | List the available metadata formats |
| help | Display the help commands |
| lvchange | Change the attributes of logical volume(s) |
| lvcreate | Create a logical volume |
| lvdisplay | Display information about a logical volume |
| lvextend | Add space to a logical volume |
| lvmchange | Due to use of the device mapper, this command has been deprecated |
| lvmdiskscan | List devices that may be used as physical volumes |
| lvmsadc | Collect activity data |
| lvmsar | Create activity report |
| lvreduce | Reduce the size of a logical volume |
| lvremove | Remove logical volume(s) from the system |
| lvrename | Rename a logical volume |
| lvresize | Resize a logical volume |
| lvs | Display information about logical volumes |
| lvscan | List all logical volumes in all volume groups |
| pvchange | Change attributes of physical volume(s) |
| pvcreate | Initialize physical volume(s) for use by LVM |
| pvdata | Display the on-disk metadata for physical volume(s) |
| pvdisplay | Display various attributes of physical volume(s) |
| pvmove | Move extents from one physical volume to another |
| pvremove | Remove LVM label(s) from physical volume(s) |
| pvresize | Resize a physical volume in use by a volume group |
| pvs | Display information about physical volumes |
| pvscan | List all physical volumes |
| segtypes | List available segment types |
| vgcfgbackup | Backup volume group configuration |
| vgcfgrestore | Restore volume group configuration |
| vgchange | Change volume group attributes |
| vgck | Check the consistency of a volume group |
| vgconvert | Change volume group metadata format |
| vgcreate | Create a volume group |
| vgdisplay | Display volume group information |
| vgexport | Unregister a volume group from the system |
| vgextend | Add physical volumes to a volume group |
| vgimport | Register exported volume group with system |
| vgmerge | Merge volume groups |
| vgmknodes | Create the special files for volume group devices in /dev/ |
| vgreduce | Remove a physical volume from a volume group |
| vgremove | Remove a volume group |
| vgrename | Rename a volume group |
| vgs | Display information about volume groups |
| vgscan | Search for all volume groups |
| vgsplit | Move physical volumes into a new volume group |
| version | Display software and driver version information |
++++++++++++++++++++++++++++++++++++++++++++++++++++++++++++++++++++++++++
https://www.youtube.com/watch?v=dMHFArkANP8
++++++++++++++++++++++++++++++++++++++++++++++++++++++++++++++++++++++++++
LVM is short for Logical Volume Manager
What it does ? it allows for the creation of groups of disks or partitions that can assembles into single (or multiple filesystems )
- Logical Volume can be used for nearly any mount point except for boot (Boot has to be regular file system. The reason for this the boot cannot read the LVM meta data .
- One of the great things about LVM is its flexibility : Allows for resizing of volumes .
- You can shrink a volume to reduce unused space or you can grow a volume which is handy for locations which is /var where we have a whole lot of log files
- Snap Shot : Another important feature is the snapshot - allows you to take point in time copies of your logical volume . That snap shot you can copy it back to a different location and use it as a backup method for you current hard disk .
Example of a Logical Volume Group .
At the bottom level you are going to have your Physical Volumes which are your actual disks that you have in your system such as below ones .

Now you don't have to have three disk . I am just showing this as an example . You can even have a system with just one disk .
Above your physical volume you have something called your Volume Group . As you can see the Volume Group VG_Base encompasses all volume groups .

And once again a Volume Group can be attached to one disk . But here we are showing that all the Physical disk belong to this Volume .
And top of your Volume Group you are going to have your actual Logical Volume .

This is where we actually curve our volume group into individual components that are a lot like partitions
Above the Logical Volumes we have your actual filesystems .

Your logical volume again acts like a partition . Your logical volumes again acts something like a partitions . But a Partition still needs a file system on it. This is where you put your XFS , EXT4 on top of your Logical Volume . On the file system layer you have your actual directory
Basic commands that will display the setup here on the machine .
$ pvs command for Physical Volume command
Physical Volume Scan : pvs
This display all physical volume that belong to one logical volume manager setup .
This Physical disk has a volume group

here we have only one Volume group PV and this belongs to VG VolGroup00 ,
Now lets go one step above that and take a look at Volume Groups. We use the vgs command for this . VGS like PVS scans for various volume groups on your system

There is a Physical Volume attached by there are two logical volumes contained in this Volume Group .
So lets run LVS to run a short volume scan to see what these logical volumes are .
$ lvs
ans here we can see two individual logical volumes

No comments:
Post a Comment